How to integrate ChatGPT in Microsoft Teams, Telegram, Slack, SMS, Skype, Alexa and more
Using Microsoft Bot Framework, ChatGPT API and a Short Term Memory

I am a cloud-native developer at the international university of applied sciences, working mostly with Microsoft technology
What we will do
OpenAI released the API for ChatGPT a few days ago, offering anyone with a credit card and some coding knowledge to implement ChatGPT functionality into any other products. Since the ChatGPT API model "davinci-turbo" is marketed specifically as "chat" (in contrast to other models like "curie", "codex" and others), why hassle with creating a chat website from scratch, and not use already existing chat clients? Let's do that.
One Service to rule them all
Microsoft Bot Framework is a service that acts as a middleman between code and front-end clients. As a resource known as "Bot Service", it is also available as a Drag&Drop No-Code option using the "Bot Framework Composer". The composer is a Topic on its own and comes with its own set of challenges and capabilities, and is not discussed here.
Instead, let's look at "Bot Framework SDK", which is the correct term to use in Bing searches. Bot Framework SDK provides a full code implementation of a web service, that is capable of getting messages from and sending messages to the Bot Service.
In Visual Studio you need an extension from Github, which also provides a handy list of clients:
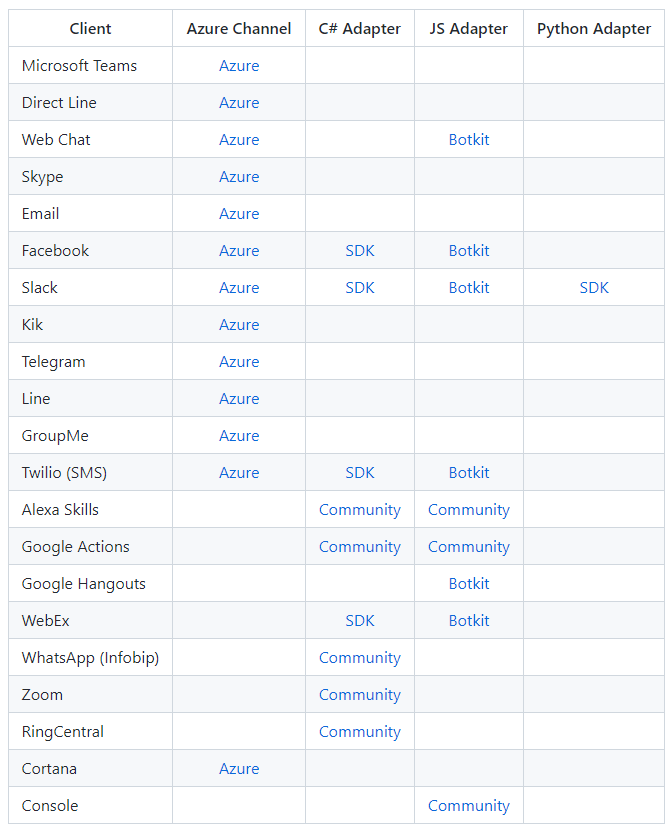
Source: https://github.com/microsoft/botframework-sdk#channels-and-adapters
Implementing a Bot
Microsoft provides a nice tutorial for getting started with Bot Framework SDK, which is why I will not cover that here.
Assuming you made your first Echo Bot, or are using an existing Bot, you will have an implementation of ActivityHandler. Protip: use TeamsActivityHandler if you are aiming at implementing Teams specific It will give you the same capabilities as the ActivityHandler, but allows for Teams-specific actions like sending and receiving files.
In any case, you will end up with this function:
protected override async Task OnMessageActivityAsync(ITurnContext turnContext, CancellationToken cancellationToken)
This is where messages arrive that the Azure Bot sends to the /messages endpoint.
The turnContext has a very important functionality: it saves a state. By using a conversationStateAccessor, you can save whatever Complex Object you want. Example:
var conversationStateAccessors = _conversationState.CreateProperty(nameof(ConversationFlow));

var state = await conversationStateAccessors.GetAsync(turnContext, () => new ConversationFlow(), cancellationToken);
One such complex Object will be our "Brain". What ChatGPT "remembers" from previous messages. Since the ChatGPT API requires a specific format to provide the conversation history we can make use of that by implementing a class:
    public class Message
    {
        public string role { get; set; }
        public string content { get; set; }
    }
role is any of "System", "Assistant" or "User". "System" is like a voice in the AIs head that tells it extra information, while "assistant" and "user" represent the actual conversation. The state, therefore, needs an List<Message> History Property.
The state and history will be unique for every conversation in any channel, which is why we do not need to worry about keeping users' chats separate. This is handled by the bot for us automatically.
Talking to the AI
To now make the actual ChatGPT API call the URL is https://api.openai.com/v1/chat/completions, with a body containing the messages, and the API Key in the Authentication: Bearer header. Next to the messages, the endpoint also expects you to specify which model to use, and, optionally, temperature, top_p and more.
We can use that as object-oriented as well with a wrapper class like this:
    public class ChatGPTBody
    {
        public string model { get; set; } = "gpt-3.5-turbo";
        public Message[] messages { get; set; }
        public float temperature { get; set; } = 0.9f;
        public float top_p { get; set; } = 1f;
    }
The latest message in the messages array should be the newest user message.
Now sending the prompt is easy:
 HttpClient http = new HttpClient();
http.DefaultRequestHeaders.Authorization = new System.Net.Http.Headers.AuthenticationHeaderValue("Bearer", apiKey);

StringContent content = new StringContent(JsonSerializer.Serialize(body), Encoding.UTF8, "application/json");

string url = "https://api.openai.com/v1/chat/completions";

var request = await http.PostAsync(url, content);
body is of type ChatGPTBody and contains all messages as well as the desired model.
Refer to this page to find out the nitty details of parsing the response. The quick and easy way is:
var root = JsonNode.Parse(resultContent).AsObject();
var choices = root["choices"].AsArray();
var Jsonmessage = choices[0]["message"];
Message message = Jsonmessage.Deserialize<Message>();
After you got the AIs' response don't forget to save it as a role: assistant message in the state. Next time the AI will "remember" what you said, what it said, and can act accordingly.
Attention: there is a limit of 4000 tokens for the history, the prompt and the answer, which is roughly 16.000 characters. It is recommended to limit the history. Bing chat uses a history of 8 messages for example. You can also reduce the size of big messages using a "summary" call to the same API.
More Clients
Using the "Channels" blade of the Azure Bot you can connect new clients to the bot, which in turn connects to your web service, which in turn connects to OpenAI:

Each channel has different ways to implement. For example, here is how to connect Microsoft Teams:
https://learn.microsoft.com/en-us/azure/bot-service/channel-connect-teams?view=azure-bot-service-4.0
Here is how to connect to Telegram:
And on the menu on the left on either of those links, you will find all other clients as well.

Done
You might want to review the Prompt Design Document from OpenAI: https://platform.openai.com/docs/guides/completion/prompt-design
Happy AI-ing